- Building a 3D Digital Clock with ArduinoPosted 3 months ago
- Creating a controller for Minecraft with realistic body movements using ArduinoPosted 4 months ago
- Snowflake with ArduinoPosted 4 months ago
- Holographic Christmas TreePosted 5 months ago
- Segstick: Build Your Own Self-Balancing Vehicle in Just 2 Days with ArduinoPosted 5 months ago
- ZSWatch: An Open-Source Smartwatch Project Based on the Zephyr Operating SystemPosted 6 months ago
- What is IoT and which devices to usePosted 6 months ago
- Maker Faire Rome Unveils Thrilling “Padel Smash Future” Pavilion for Sports EnthusiastsPosted 7 months ago
- Make your curtains smartPosted 7 months ago
- Configuring an ESP8266 for Battery PowerPosted 7 months ago
The soul of the open source automatic bartender: the DRINK MAKER software

After the first installment about the hardware, here we deal with the software to be loaded in the Raspberry Pi board and the RandA’s firmware, needed in order to make our automatic bartender machine operational.
In the last July’s issue we proposed a project that, even if probably unusual, was undoubtedly fitting for the summer season: a robotized machine, to be placed in a coffee bar or even at home, and capable of preparing excellent and fresh drinks, which are chosen from the user interface (that can be accessed from a smartphone, tablet or even by a PC). In the first installment we already analyzed the details concerning mechanics and electronics for this technological wonder. Therefore, in this article we will see how to configure and use the machine, in addition to an analysis of its operations, along with the dedicated software.
Let’s start by saying that we may acquire all the software needed for the machine operations by means of GitHub, from OpenElectronics’ Drink Maker repository: here we will be able to choose if to download the .iso image, which is already available, and to install it in our SD card by means of a program such as Win32 Disk Imager or, by starting from a Raspbian clean install, to download the installer and the connected files via GitHub.
In the case we choose to follow the first path, we will not need particular configurations, while when choosing the second one, we will need to install Raspbian (we advise the following build: 2015-02-16-raspbian-wheezy) and to configure it later.
Let’s see how to do it: as a first thing we will boot Raspberry Pi and, if connected via ssh with a program such as PuTTY, we will execute sudo raspi-config. If on the other hand we are using a connection via monitor and peripherals, the configuration screen will automatically appear at the start.
As a first thing, let’s select Expand Filesystem and press the ENTER key; we will be asked to confirm, so let’s press the ENTER key again.
Let’s move now onto the Internationalisation Options and access them by pressing the ENTER key, we will then have to carry out the following operations:
- to choose change locale and to press the ENTER key, to scroll down with the arrows until we reach en_GB.UTF-8 UTF-8 and to press the space bar in order to deselect it;
- to scroll down until we reach it_IT.ISO-8859-1 and to press the space bar in order to select it, followed by TAB and the ENTER key so to confirm (a screen will appear, to let us choose between it_IT and None, we will choose it_IT and continue, by pressing the ENTER key);
- to return to the Internationalisation Options and this time, to select Change Timezone, followed by Europe and finally Rome; we will possibly have to change the Keyboard layout as well, and to pick the one we are more comfortable with, by entering the Change Keyboard Layout and selecting the features of our keyboard;
- to move and press TAB twice while on Finish, and to confirm the reboot via Yes.
Our Raspberry Pi will automatically reboot, and once this has been completed we will have:
- to move in the home/pi folder, by means of the following command: cd /home/pi;
- to download the installation folder from the GitHub repository, by means of the following command: git clone https://github.com/open-electronics/drink-maker.git;
- to move in the utils folder, by means of the following command: cd drink-maker/utils;
- finally, to execute the installer: sudo bash install.sh.
This script is a very important one, in fact it will verify that everything is ready in order to proceed to the website’s configuration.
During the script’s execution, some messages concerning the setup progress will be printed to screen; the installation may require some tens of minutes, since the whole operating system will be updated, and everything needed in order to host a website will have to be installed and configured, and the website itself will have to be created (by downloading all the packages needed), and the firmware in RandA will have to be installed, so to check all the various components, such as the servomotor, the stepper-motor and the LEDs.
Moreover, the script will create and populate the database for our application, and will automatically download the sketch in RandA.
At the end of the installation, our Raspberry Pi will reboot and finally we will be able to connect ourselves, and to use our system.
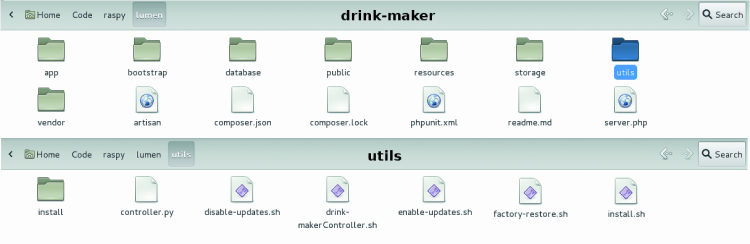
Once the installation is complete, we will find a series of files and folders in /var/www/drink-maker, as shown in figure.
Now that all the packages needed for the project are installed, we may move onto the configuration of our web app, that can be reached via any device connected to the machine’s local network; for the purpose, let’s connect with any browser to the following address: drink/maker (some browsers, however, will read this kind of URLs as a research request; in this case we will be redirected to the webpage showing our search engine’s results, and we will have to type in http://drink/maker in order to specify that this is a veritable website).
Once connected, we will be shown a page that is needed in order to carry out the first machine’s configuration, and it will require to determine the following settings before proceeding:
- Username and password are needed in order to access the control panel (the default password is “password” but we strongly advise to change it);
- Initial status ; if we set it to the “To be approved” state we will have to manually approve each received order, while if we choose “Approved” the orders will be automatically approved; the first option gives us the possibility to give priority to a customer instead of the other, but it requires an operator that would constantly check the orders received, while the second option is a completely automatic one;
- Max capacity; this is the maximum drink volume (expressed in cl) that is possible to pour in a glass; please remember to leave some space for ice, when you set it;
- Start method is the method with which the machine is started: if set on auto, it will continue to automatically produce drinks, only leaving a certain number of seconds between a drink’s preparation and the other, without waiting for any start signal; this could be dangerous in the case we didn’t make it in time to place a glass on the small moving plate. There is also the coin mode, that on the other hand sees the activation via token dispenser: it will start the creation of a drink only after having received a token as a payment (it could be given in limited numbers during a party, or sold at a coffee bar’s cash register, with a normal sales receipt);
button, on the other hand, will start the machine at the pressure of a button connected to RandA.
- Timeout time; it is the time after which a drink (awaiting the start by means of button or token dispenser) will be discarded due to a failed activation; if the user didn’t manage to activate the machine in time, he will be able to order the drink again without having to be placed at the end of the queue, by acting on a button in the page summarizing his order. However, if the Initial Status is set to the “To be approved” mode, the drink will have to be approved again; if the activation mode selected (Start method) is auto, timeout time will indicate the waiting time between a drink and the other;
- WiFi SSID, that is the name of our Wi-Fi network; let’s select it and type in the password, in order to connect ourselves (if we can’t manage to see our network, the signal is probably too feeble, or the Wi-Fi key is not connected to Raspberry Pi’s USB port).

We will be able, however, to modify these settings at any time, via the control panel.
Once this procedure is complete, after having connected ourselves to a Wi-Fi network and after having clicked on Save, we will be able to disconnect the LAN cable from our machine, and to use it via Wi-Fi network.
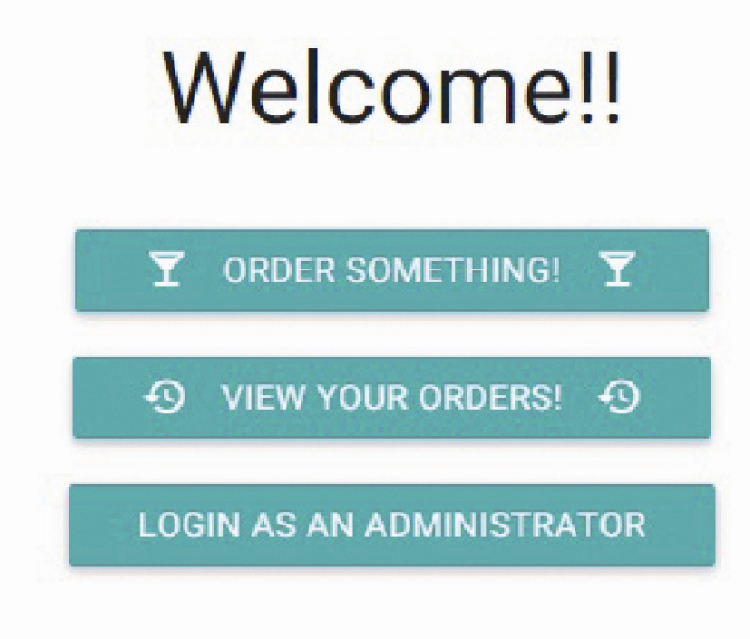
Once ready, let’s click on the button in order to continue, so to be brought to the website’s landing page. We can now see three buttons that bring to three different website’s zones:
- Order something! (allows to order a drink);
- View your orders! (allows, on the other hand, to see the state of all the recently carried out orders);
- Login as an administrator (enables the access to the control panel, after having required a login with the previously selected credentials).
The page that can be accessed from Order something shows two boxes, in which to type in the name of he who is ordering (so to then recognize him and warn him that his cocktail is ready) and one in which it is possible to choose the drink volume to be ordered, with an amount ranging from 10 cl up to a maximum chosen during the configuration.

Below a list of all the available cocktails is found, along with their ingredients, an informational picture and a bell icon that will allow us to order them. This icon is disabled, if one of the cocktail’s ingredients is exhausted, or if the amount required exceeds the one available; by modifying the desired drink amount, all the icons will be consequently updated, thus showing if it is possible or not to order the various cocktails for the desired amount.
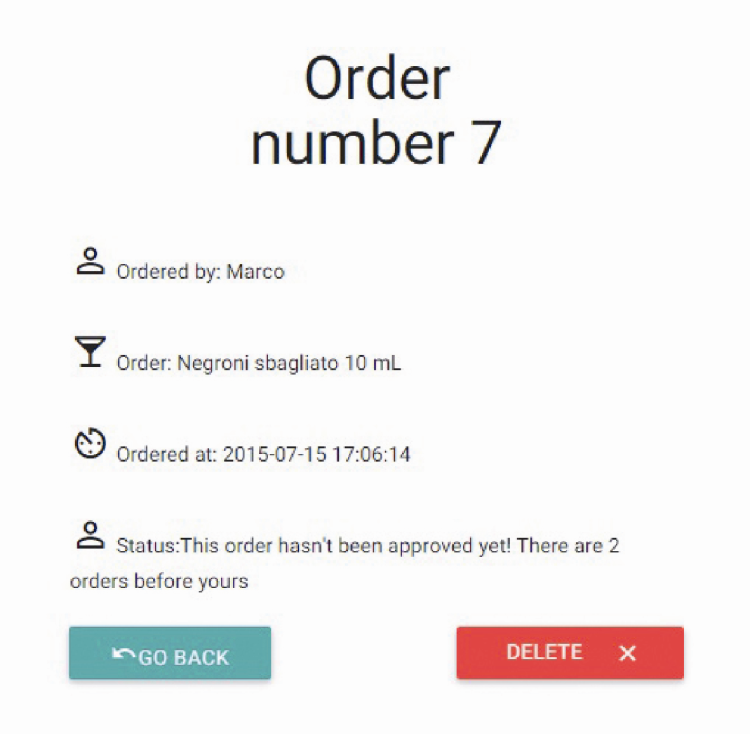
Once the order has been carried out, we will be redirected to a page showing the information concerning our order, there we will find the name of he who ordered it, the drink’s name and amount (possibly accompanied by a picture), the hour at which the order was carried out and its state, along with our drink’s position in the orders’ queue.

If the drink is classified as timed out (it may occur if we do not activate the machine in time, when our turn has come…) a button will also appear, allowing us to order again our cocktail: do not fear, you will not end at the end of the queue again!
From this page it is also possible to cancel the order, if it has not yet reached the execution phase.
On the other hand, from the View your orders page a list of the various orders that have been carried out is available, and by clicking on each one of them it is possible to see a detailed account of the order, as the one described above.
The last of the three pages is Login as an admin: by clicking on it, you will be asked to type in username and password, as chosen during the initial configuration procedure; if this data is correct, you will be brought before a control panel containing four sections: all of them can be selected via the various tabs found under the title.

Orders shows the list of the incoming orders and of those being prepared; the name of the drink and the customer that ordered it are shown, as well as the drink’s volume and the order status. Also, there is an X key, in order to cancel the order. Moreover, if this one has not yet been approved, (in the case we had chosen the manual orders’ approval), we will also see an arrow that will allow us to approve one order at the time, so to be able to choose the customers’ priority. The list of the orders available is automatically updated every four seconds, so it will not be needed to continuously refresh the page.
On the other hand, the Ingredients page is vertically divided in two parts: in the first one, it is possible to see the list of all the ingredients found, with their remaining amount in the bottles (expressed in cl) and their position inside of the machine (going from 0 to 9, and using -1 to indicate if the bottle has not been mounted on the machine); in the second one it is instead possible to add an ingredient with its stock amount. The added ingredient will be considered as “not mounted on the machine” until it is moved by means of the same page.
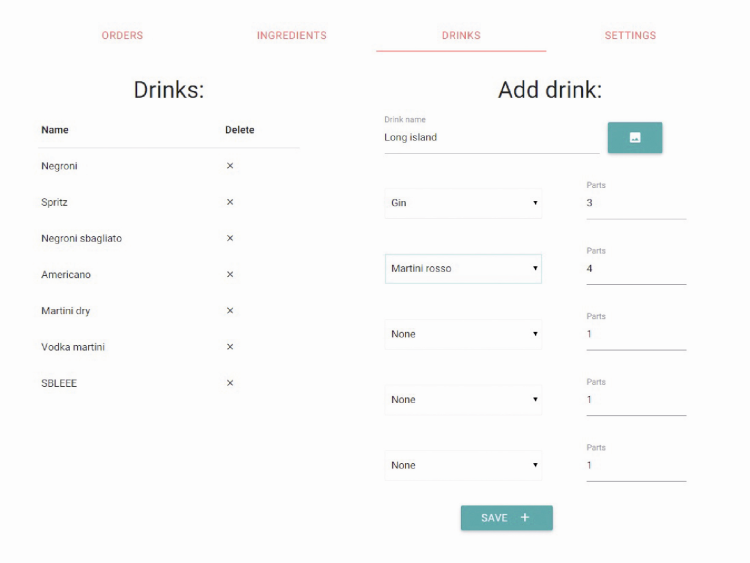
The Drinks page shows all the drinks the machine knows, and has an X in order to delete them; in the right column it is instead possible to create a new drink, by choosing its name and possibly by loading a picture. Below you will find five boxes, from which to choose the ingredient and its amount (in parts) in the cocktail; if we wanted to use less than five ingredients it is sufficient to leave the boxes empty. If we select two identical ingredients in a row they will be joined, while if two identical ingredients are alternated by other ones, it will be considered as a specific preparation request (such as “pour two parts of vodka, then a gin one, then another vodka part”) and then the machine will prepare the drink, taking it into account.
Settings, finally, is a page that is similar to the initial configuration one, and will allow us to change the login credentials, the network to which our Drink Maker is connected, the glasses’ capacity, and other settings.
Moreover, there is a button for the machine’s switching off, to be pressed each time we want to turn off the machine. The switching off will instantly stop every process underway.
If we wanted to reset the database, in order to delete all the pieces of information added during the usage, we will have to connect to the machine by means PuTTY or a similar software via SSH, and move ourselves in utils: cd /var/www/drink-maker/utils ed eseguire il factory reset con sudo bash factory-restore.sh.
Once this procedure is complete, we will have to configure the machine again.

Drink-Maker is provided with an automatic update system (the reason why some screens or code files may slightly differ from those shown in the article, after downloading): each time it is started, it will verify on the Internet if there are any updates on the GitHub repository, and will download all the modifications, possibly reinstalling the software.
We therefore advice to always turn the machine on at least ten minutes before its usage, in order to give it time to carry out the updates’ installation. Each time that an update is carried out, any possible modification to the local code files will be lost, however the database and the personal information will not be modified.
If we wanted to disable the automatic update system, we will have to move ourselves in utils and carry out the following command: disable-updates: sudo bash disable-updates.sh
On the other hand, to enable it again, at a later stage, we will have to execute (from the same folder) enable-updates:
sudo bash enable-updates.sh.
Moreover, if we wanted to create a private repository on which to work on, so to create new features and improvements independently from the main repository, we will be able to “fork” (that is, to create a parallel copy of the official project, that is independent from it) the Open Electronics’ repository (named drink-maker), and change the application’s remote, by executing the three following commands:
cd /var/www/drink-maker
sudo -u www-data -H git remote set-url origin https://github.com/open-electronics/drink-maker
This way, our app will be independent from the main one and we will be able to carry out the modifications, and to publish them on our repository and to create pull requests on the main repository, in order to propose the integration of new features in the official version.

The system’s structure
In order to reduce the data duplication on our machine, we divided Drink-Maker in three subprograms, managing the various aspects of cocktail making: they exchange data when it is fit.
There is a web app that allows the users to order various drinks, to choose the amounts and to check their order status, and possibly to cancel it. From here the administrator (by means of a control panel) may manage the various ingredients’ stock, the orders’ creation and cancellation, and the modification of some general settings concerning the machine’s operations. From a technical point of view, it is the only one to access the database, and a set of calls and “user-friendly” interfaces, needed in order to receive formatted data in a way that is easy to examine (both for the user and for the other two components).
This web app is found in /var/www/drink-maker and is distributed in all the folders. The files connected to the graphical interface are found in the resources/views subfolder, while the classes dealing with the information extraction from the database (located in storage/) are found in app/ and the controllers answering the calls to the various URLS can be found in app/Http/Controllers e app/Http/routes.php.
We recommend the modification of these files to those who have an even only reasonable knowledge of the Laravel framework, and of web application development.
Furthermore, there is a script that has been created with Python3 (named “controller.py” and located in /utils), it is configured so to start at Raspberry Pi’s boot: it deals with managing RandA’s behaviour, depending on the information supplied by the web app: as a first thing, at the boot it ensures that the right sketch has been loaded on RandA, after which it will periodically check if there is any drink to make. If so, it will warn RandA and start to instruct it about the steps needed in order to make the cocktail, one by one, until it is complete. Finally, it lets the web app know that it may so communicate to the user that his cocktail is ready.
As you can see from Listing 1, at the boot the RandA sketch is loaded in the utils folder, and the serial port is initialized; afterwards it is communicated to RandA to move up to the home, to reset and recalibrate its own position. Furthermore, there are three functions dealing with the data exchange during the program execution. The first one is write_data and deals with receiving a string, with its printing in the command prompt for debug purposes, with its formatting so that it may be read by RandA, and with its sending via serial communication. Furthermore, there is wait_answer that, by means of an “infinite” cycle, each time that a command is executed waits for an answer from RandA (usually the answer is “1”, meaning “OK”, but it is possible to specify a second value to be returned as a parameter, as in the case of the activation wait time by means of a button, that may return “2” as a timeout signal”). Finally, there is fetch_url dealing with carrying out a call to a specific URL on our web app, in order to communicate the order status to it, or to obtain the execution instruction of the latter. In main_loop we can see that the “waiting” endpoint (the URL) is recalled, so to obtain information concerning the pending drink, until a drink to be prepared is obtained; the program then alerts the machine and waits for an activation signal. The script then warns the web app about a possible timeout or about the machine’s activation. In the case in which it is activated, the function starts to manage the drink preparation: as a first thing it calculates the total parts composing the drink, afterwards and on their basis, it calculates (with a proportion on the volume) the volume of each cocktail ingredient, and finally it calculates the quantities needed by the dispenser, in order to obtain that volume.
Listing1
import json
import urllib.request
import time
import serial
import math
from subprocess import *
global data,ser,base_url
def main_loop():
global data,base_url
#data retrieving
while data==None:
fetch_url(“waiting”)
time.sleep(2)
#tell the machine that we have a new drink with stuff
write_data(“NewDrink|”+data[“start”]+”|”+data[“timeout”])
if wait_answer(“2”) == “2”: #activate, expect 2 as a “timed out” signal
fetch_url(“timedout”)
else:
fetch_url(“activated”)
prepare_drink()
data=None
def prepare_drink():
#dictate ingredients
total_parts=0;
for ingredient in data[“ingredients”]:
total_parts=total_parts+ ingredient[“needed”]
for ingredient in data[“ingredients”]:
ingredient_volume= (ingredient[“needed”]/total_parts)*data[“volume”]
ingredient_volume= round_to_multiple(ingredient_volume)
parts= ingredient_volume/2
write_data(str(ingredient[“position”])+ “|”+str(parts))
wait_answer()
#update db
fetch_url(“completed”)
#reset position
write_data(“0|0”)
wait_answer()
def round_to_multiple(number,multiple=2):
if math.floor(number)%multiple==0:
return int(math-floor(number))
else :
return int((math.floor(number/multiple))*multiple)
def fetch_url(url):
global data
url= base_url+url
try:
page=urllib.request.urlopen(url)
j=page.read().decode(“utf-8”)
data=json.loads(j)
except:
data=None
def wait_answer(answer=”1”):
global ser
v=None
while not (v==”1” or v==answer):
v=ser.readline().decode(“UTF-8”).strip()
print(“In:”+v)
time.sleep(0.2)
return v
def write_data(data):
global ser
print(“Out:”+data)
ser.write(bytes(“!”+data+’\n’,’UTF-8’))
data=None
subprocess.call([“ArduLoad”, “/var/www/drink-maker/utils/drink-maker.hex”])
time.sleep(3)
base_url=”http://drink/orders/”
ser=serial.Serial(port=”/dev/ttyS0”,baudrate=9600)
write_data(“GoHome”)
wait_answer()
while True:
main_loop()
Once all this data has been obtained, the function starts to instruct RandA about the ingredients, one by one, until the drink is complete. Afterwards, it warns the web app (that will notify the customer) and asks RandA to reset the plate’s position. Finally, we find the sketch (.ino) for RandA, dealing with the decoding of the instructions sent from the controller to it. They can be either drink creation commands, or reset and calibration ones. This script also checks the lights and possibly, the additional outputs on the extra connectors found on the board.
The script’s content is a complex one, and requires a careful reading of the code; in these pages we will limit ourselves to analyze some extracts from Listing 2, that can be easily modified in order to add new mechanics and features to our Drink-Maker.
Listing2
void parseString(String message){
if(message.startsWith(“!”) && message.endsWith(“\n”)){
if(message == “!GoHome\n”){
goHome();
success();
}else if(message.startsWith(“!NewDrink”)){
int firstIndex = message.indexOf(‘|’);
int secondIndex = message.indexOf(‘|’, firstIndex+1);
int start =(message.substring(firstIndex+1,secondIndex)).toInt();
int time=(message.substring(secondIndex+1)).toInt();
goHome();
if(waitForActivation(start,time)){
success();
}else{
timeout();
}
} else {
int index = message.indexOf(‘|’);
int pos = (message.substring(1,index)).toInt();
int times = (message.substring(index+1)).toInt();
reachBottle(pos);
spill(times);
success();
}
}
}
bool waitForActivation(int mode, int time){
unsigned long start= millis();
while((millis()-start)<time*1000){
switch(mode){
case 0:
break;
case 1:
if(digitalRead(COIN_PIN)==LOW){
return true;
}
break;
case 2:
if(digitalRead(BUTTON_PIN)==LOW){
return true;
}
break;
}
}
return (mode==0);
}
When a message is received on the serial port, the parseString function is called, and it will verify the message’s integrity, by checking for the presence of “!” at the beginning and “\n” at the command’s end. Afterwards, a disambiguation will occur, in order to distinguish the various commands and, once the correct one has been identified, the procedure goes on to extract the parameters from the command, and to recall the functions dealing with the request completion. An answer is then given (success or timeout) as a serial communication, in order to let controller.py know the command’s outcome.
Thus we may expand this function in order to manage more inputs, simply by adding more else if, that will manage the specific commands, and that will extract their data and execute consequent actions.
Furthermore, there is the WaitForActivation function, that deals with waiting a possible input from the user, in order to start. Up to now there are three modes: the mode 0 limits itself to wait for a predetermined time (time is sent as a parameter to the function), the mode 1 waits for a low signal (given that we enabled the pull-up resistors) from the token dispenser’s pin, while the mode 2 waits for the same kind of signal on the button’s pin. If these events do not occur within the predetermined time, the function will return false, otherwise it will return true. Please note that, on the other hand, the 0 mode will return true for every case, since it is the auto mode.
Even in this case we may add other case to the switch located in the while cycle, in order to manage more activation modes. The commands exchanged between RandA and the Python script are very simple ones, and they all start with “!” while ending with the classic “\n”. Some examples are:
- “!GoHome” in order to make the plate return to the starting position (and carry out a reset);
- “!NewDrink|x|y” with x being the boot mode(0 being auto, 1 being coin, 2 being button) and y being the timeout interval, expressed in seconds;
- “!2|3” in order to move the plate to the second dispenser and pick up three quantity parts from the bottle.
We will then notice that Arduino’s sketch (loaded in RandA) doesn’t possess information concerning the machine’s status: it does not know which ingredient is found in a certain position, and does not even know the various drink recipes or the orders’ queue; it simply deals with receiving instructions.
On the other hand, Python’s script does not access the database or the orders’ queue, but it entrusts the web app with the management of all these factors; thus every subsystem has a single duty and this makes the structure of the three components a much simpler one, and also avoids data duplication and triplication, and to have to deal with synchronization or security problems over and over again.
Now that we know how Drink Maker operates, we may enjoy a nice ice-cold cocktail, or indulge ourselves in creating new drinks, or in implementing new functions, maybe by taking advantage of… the Ballmer Peak.

With a pinch of pleasantries, it indicates the alcohol by volume level that, once reached, allows the programmers to reach the apex of their abilities…
The video of drink maker
From openstore
DrinkMaker with 5 dispensers – in kit
RandA: the union from Raspberry and Arduino

Related Posts


-
 Arduino ISP (In System Programming) and stand-alone circuits
We use an Arduino to program other ATmega without...
- Posted 12 years ago
-

-

-
 GSM GPS shield for Arduino
Shield for Arduino designed and based on the module...
- Posted 12 years ago
-
 Small Breakout for SIM900 GSM Module
Some post ago we presented a PCB to mount...
- Posted 13 years ago
-
 Building a 3D Digital Clock with Arduino
Project to create a digital clock consisting...
- Posted 3 months ago
-
 Acoustic amplifier – in DIY Kit
This kit creates a microphone amplifier with an output...
- Posted 4 months ago
-
 Creating a controller for Minecraft with realistic body movements using Arduino
Project of a controller that maps body movements...
- Posted 4 months ago
-

-
 Holographic Christmas Tree
Beautiful project to create a Persistence of Vision...
- Posted 5 months ago
3 Comments