- Building a 3D Digital Clock with ArduinoPosted 3 months ago
- Creating a controller for Minecraft with realistic body movements using ArduinoPosted 4 months ago
- Snowflake with ArduinoPosted 4 months ago
- Holographic Christmas TreePosted 4 months ago
- Segstick: Build Your Own Self-Balancing Vehicle in Just 2 Days with ArduinoPosted 5 months ago
- ZSWatch: An Open-Source Smartwatch Project Based on the Zephyr Operating SystemPosted 6 months ago
- What is IoT and which devices to usePosted 6 months ago
- Maker Faire Rome Unveils Thrilling “Padel Smash Future” Pavilion for Sports EnthusiastsPosted 6 months ago
- Make your curtains smartPosted 7 months ago
- Configuring an ESP8266 for Battery PowerPosted 7 months ago
Internet Radio with Raspberry Pi
Since long past times, when Gugliemo Marconi has amazed the entire World broadcasting his radio signals from the Elettra ship, a subject held dear by electronic engineers has been radio transmission. After these years, the scenario has changed a lot, firstly with the appering of digital technologies (DAB, for instance) and, up to day, with the streaming of radio transmissions on internet network by the TCP/IP protocol. Is this still radio? Or we can just talk of broadcasting radio station programs by TCP/IP network?.
Less fascinating than the old radio technology by “internet radio” we are able to send “radio” communication far beyond the range of “wireless” radio. In the current and in following articles, we would like to approach the topic of radio and audio broadcasting on TCP/IP network and its integration with radio repeaters, in order to build something like “hybrid” radio links. The example proposed in the article is based on Raspberry Pi that is, by now, the preferred platform for our tutorials on GNU/Linux embedded world. In this first issue we are depicting how to build a portable internet “radio”, it is a device suitable for receiving and managing radio and audio streaming carried by an internet connection, both wired and wireless. We will also cover the management of audio track playlists stored on USB keys or on network shared disk drives. Streaming trasmission requires sending a flows of TCP/HTTP packets containing bunches of digitazed audio from production and distribution servers to clients scattered all over internet networks, where the streaming itself will be turned again into audible sounds.

Figure represents the generic flow of transmissions and reception of audio streaming over internet. The streaming transport protocol can work at many different transmission rates in order to allow the client to choose the best rate according with the speed of the connections it is wired to. In this project we considered two different types of “human” interface”. The first is based on the LCD shield. The second is a web based interface. On the LCD shield five push buttons allow setting the radio by application menu functions as like as browsing radio station and audio tracks or setting up the volume.
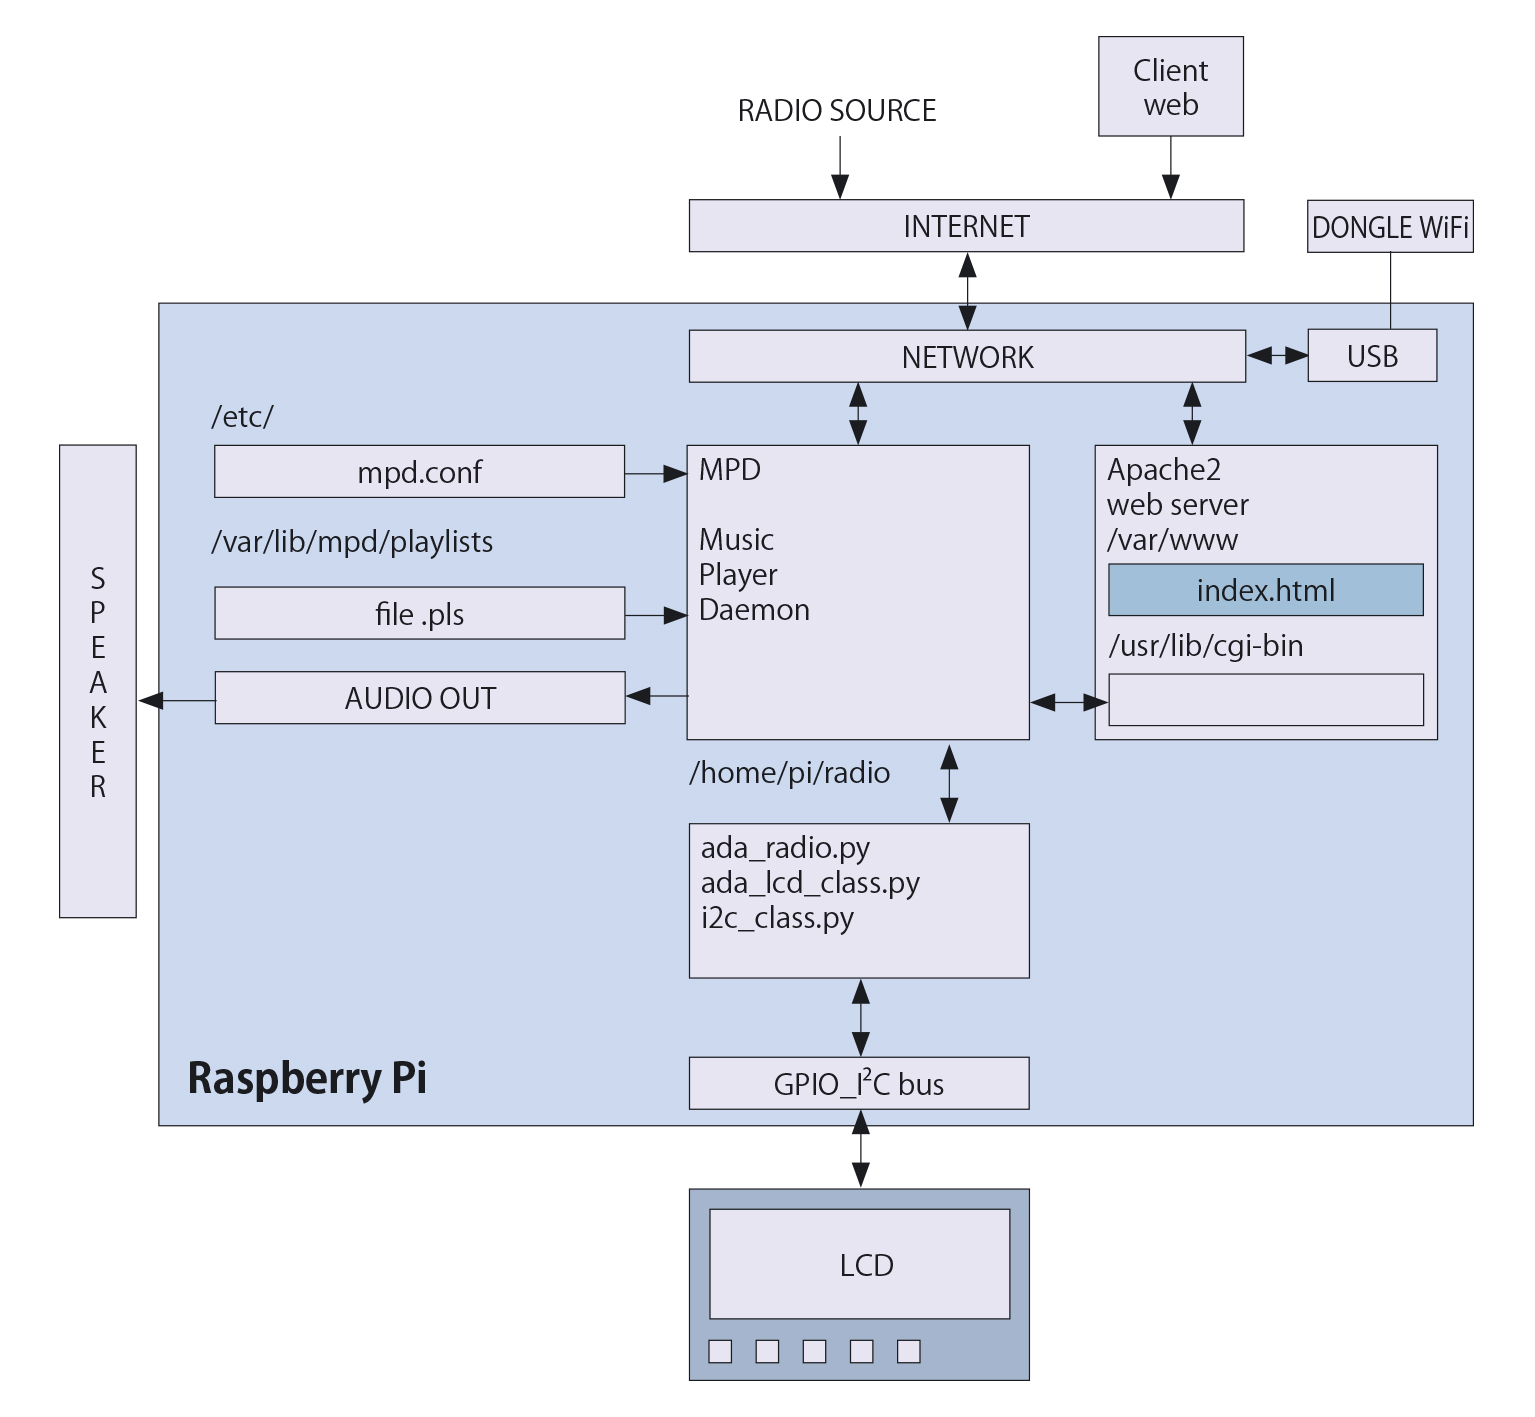
The figure shows the application block diagram we are going to set up. Tanks to the effort of Bob Rathbone and Adafruit Industries, both expert in building and delivering products and expertise on Raspberry Pi, that have delivered many useful software tools and application to the community under the GNU GPL licence, we can adopt in our project, many “ready to use” software “bricks”. Actually, to complete the project, it is just required to physically assembly and install the LCD shield, the WiFi dongle and to download and configure the software. No programming it is required. The core module of the whole project is the MPD software. MPD stays for Music Player Daemon, that is a software server aimed to play audio streaming and files. It has been written to run on old pc powered by Pentium 75 processors. The main purpose of this software is using as less system resources as possible, while being able to perform gapless playback, output audio buffering and cross fading. This features and the availability of the package for the Debian distribution make it the ideal tool to be installed on Raspberry Pi. Moreover MPD developers have kept a clear separation between server and client side of the tool. This leave the user free to choose which user interfaces adopt to manage his proper sound box, among the many available. On the web we can get a variety of clients with different interfaces like command line, stand alone GUI and web oriented applications, compatible with different device types like PC, tablet, smartphones, etc. You can find a list of available clients at the address http://mpd.wikia.com/wiki/Clients
You can go trough and try many of them. In this project we are going to install the solution developed basically for Raspberry Pi by Bob Rathbone (thanks!), from a fork of the Snoopy MPD client.
Setting up Raspberry Pi
In this project we choose to start from a fresh copy of Raspberry Pi Raspbian operating system. This because who is going to build a project like this is probably going to develop a “dedicated” solution of “portable” internet radio.
Operating system
To start from a fresh copy of the operating system we have to download the last version from the download section of the Raspberry Pi official site at the address http://www.raspberrypi.org/downloads. Unzip and burn it into a SD Card using Win32DiskImager tool. Insert the SD Card in the Raspberry Pi slot, connect the network and the power cables and turn it on. Once connected, create the “root” user, and login with it. The first operation is upgrading the Raspbian distribution typing:
apt-get update
apt-get upgrade
Type:
raspi-config
to open the Raspberry Pi configuration tool and expand the rootfs filesystem to fit the entire capacity of the SD Card. At this point we can take advantage of having the raspi-config opened in order to configure the correct geographical area, the current date and time and the keybord layout configuration. Exit the raspi-config configurator and accept the reboot request. Reconnect to Raspberry Pi using the “root” login and, using WINScp, enter the /home/pi folder and add a new folder. Name it “radio”.

The final path will be:
/home/pi/radio

Now it is time to get the Bob Rathbone sofware. Cd to the “radio” folder, get the package from Bob Rathbone site and untar (unpack) it by typing the following commands:
wget http://www.bobrathbone.com/raspberrypi/source/pi_radio.tar.gz
tar -xvf pi_radio.tar.gz
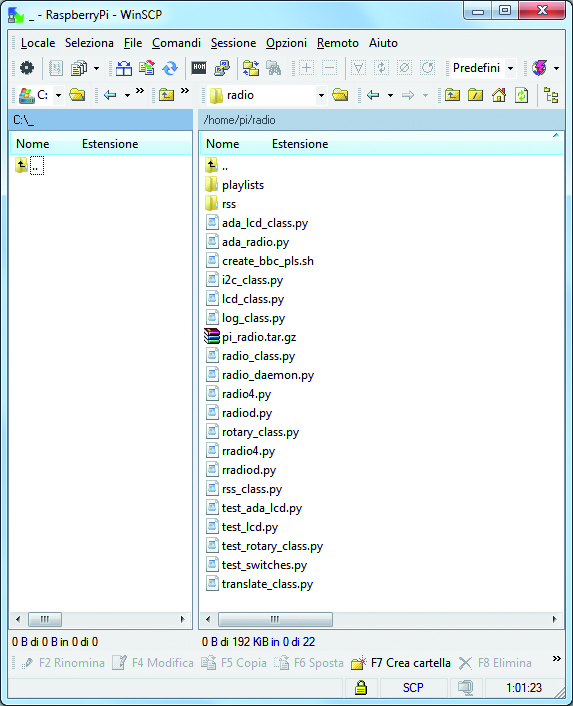
As we can see in figure after having unpacked the package in the /home/pi/radio folder we will find a lot of new files. Hold back for a while the curiosity to put something running immediately. We have to spend a few time more installing and configuring dependencies and additional packages before firing up everything. The LCD shield has the chip MCP2307 on board. This offer 16 I/O supplementary lines to the Raspberry Pi GPIO. This lines can be programmatically managed by i2C bus. As we know, the i2C bus on Raspberry Pi has to be activated manually and require additional software tools to be operated. We’ll do it immediately. For instance we have described the LCD shield in this post. In that article you can find a box with a deep description of MCP2307 chip characteristic and usage. Shutdown Raspberry Pi by typing:
shutdown –h now
Turn the power supplier off and position the 16 pin LCD shield connector on to the corresponding Raspberry Pi GPIO connector. Pay attention that the Ethernet and USB connector don’t make contact against the PCB of the LCD shield. In case you can cover the connector with insulation tape. Verify that all the DIP switches are on the “ON” position (all MCP2307 address pins wired to ground). Now power Raspberry Pi on again and reconnect to it. Refer to the instruction in our post to enable i2C bus driver, in order to communicate with the MCP23017 chip. At the end we can check if we can “view” the MCP23017 chip on the i2C bus, typing the command:
i2cdetect -y 0
in case you are using a Raspberry Pi Rev. 2, in case of Rev. 1, instead, the right command to type is:
i2cdetect -y 1
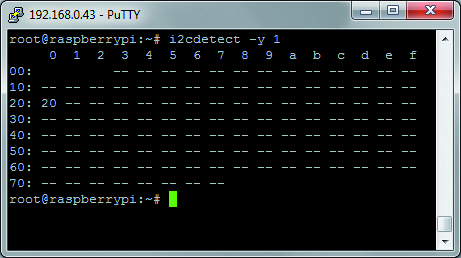
If you get an output similar to the one shown in figure, where 0x20 is the i2C address of MCP2307, everything has gone right.
Music Player Daemon
The server and client MPD packets are included in the official repository of Raspbian distribution, so we can install both of them typing:
apt-get install mpd mpc

Be patient while the main packages and all the dependencies get installed.To configure and test MPD for the first time we can use one out of the many “playlists” files included in the package. We can find them in the /home/pi/radio/playlists folder. For instance, you can choose the ukblues.pls file. MPD stores playlists files in the directory /var/lib/mpd/playlists folder. To get everyting working we should just copy our file into the right folder, bytyping:

Now we have to modify a couple of parameters in the MPD configuration file . Open the mpd.conf file in the /etc/ directory. Modify the “ bind_to_address” entry from “localhost” to “any” as shown in figure in order to allow access to the MPD server from any host in the network.

#bind_to_address “localhost”
bind_to_address “any”
Next modify the entry “zeroconf_enabled” from “yes” to “no” in order to avoid the need to publish a server name on the network.
#zeroconf_enabled “yes”
zeroconf_enabled “no”

We will use Raspberry Pi IP address instead instead the server network name. Now we can save and close the mpd.conf file. Connect an amplified loud speaker or a stereo headphone to the Raspberry Pi audio output 3.5mm jack and start the MPD server typing:
service mpd start

Then type the two following commands to load and play the playlist:
mpc load ukblues.pls
mpc play 1

If you can hear some music coming from the loudspeaker or from the headphone everything has gone right (up to now) and can continue to complete the project. Bob Rathbone’s project includes a series of programs to interface different types of LDC displays, including LCD connected to the GPIO pins or driven by i2C bus. As described in this post, the LCD shield is compatible with Adafruit libraries, and so the best choice among the Bob Rathbone’s collection is the ada_radio.py program, a python program based on Adafruit libraries to make the bridge between the MPD server and the LCD display. The complete Bob Rathbone solution for the Adafruit compatible LCD display includes the following modules:
• ada_radio.py; is the main program to managing the application by LCD display and buttons;
• ada_lcd_class.py; is the service class to interface LCD and buttons by i2C bus;
• I2C_class.py; is the lowest level i2C interfacing class by Adafruit;
• test_ada_lcd.py; is a service program to test LCD functions..
As well designed daemons, the status of ada_radio.py server can be set by command line:
/home/pi/radio/ada_radio.py start
starts the LCD server.
/home/pi/radio/ada_radio.py stop
stops the LCD server:.
/home/pi/radio/ada_radio.py status
returns the current LCD server status.
/home/pi/radio/ada_radio.py version
shows the software version.
LCD shield functions


To manage a web enabled application requires a web server where publish and deliver static and dynamic web pages. Dynamic web pages are pages generated on demand by programs with customize contents, driven by system and application status or client filters and parameters. Our choice for the web server has been Apache2. Here we mention only the main command to install Apache2, its dependencies and additional packages required from our application:
apt-get update
apt-get install apache2 php5 libapache2-mod-php5
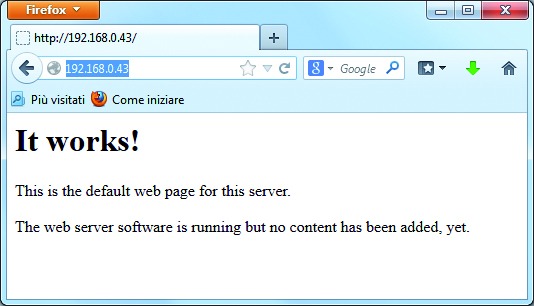
At the end of the installation process we could test that the web server is working correctly. Open a web browser and type Raspberry PI IP address in the url field. If you get in response the page shown in figure, the server is working fine. Now you can install a web front end for MPD. There are many of them listed at the address http://mpd.wikia.com/wiki/Clients. Once again we choose the one provided by Bob Rathbone. To install it, from the terminal shell go to the /home/pi/radio directory and then download the package typing the command:
wget http://www.bobrathbone.com/
raspberrypi/source/pi_radio_web.tar.gz

Unpack the gzipped file in the same directory typing:
tar -xvf /home/pi/radio/pi_radio_web.tar.gz

At end all file will be uncompressed into the right directories /var/www and usr/lib/cgi-bin. Start both MPD and ada_radio.py servers typing:
service mpd start
/home/pi/radio/ada_radio.py start
Back to the web browser type again the Rasperry Pi IP address. You can see now the web page:

Click on “Web interface” tab to get to the page:

Here you can select radio stations by clicking on them. You can select the audio source by clicking on “Radio” or “Music” buttons.
WiFi interface configuration
To make our project “portable” we must free it from the wired connection to the internet nnetwork. The solution is to install a USB WiFi Dongle on to the Raspberry Pi and configure the connection to your domestic Access Point. It doesn’t require additional drivers to install and, once plugged in a Raspberry Pi USB slot, it is automatically recognized by the operating system. When you plug in a device in an USB slot, may be the Raspberry Pi reboots. This behaviour could be due to a current fall down. In case of reboot remember to restart the servers. You can check that the dongle has been recognized by the operating system typing the command:
lsusb
We can check the device name of the dongle, in general wlan0, typing the command:
ifconfig
To configure the WiFi connection to join your access point requires the following steps to be completed. Open the “interfaces” configuration file, located in /etc/network directory and check that it contains the following lines:
auto lo
iface lo inet loopback
iface eth0 inet dhcp
allow-hotplug wlan0
iface wlan0 inet manual
wpa-roam /etc/wpa_supplicant/wpa_supplicant.conf
iface default inet dhcp
In old versions of Raspberry Pi Raspbian operating systems my be you can find something different. In case copy the lines above into the “interfaces” file.
Save and close the file. Now open the wpa_supplicant.conf file in the /etc/wpa_supplicant directory. You should find the following lines in the file:
ctrl_interface=DIR=/var/run/wpa_supplicant
GROUP=netdev
update_config=1
Add the following new configuration lines under the lines above:
network={
ssid=”your_SSID”
scan_ssid=1
psk=”your_CHIAVE”
proto=RSN
key_mgmt=WPA-PSK
pairwise=CCMP
auth_alg=OPEN
}

Obviously you have to replace values “your_SSID” and “your_CHIAVE” respectively with the name of your SSID and password. This is true if you wireless lan is WPA2 protected. For different cases check the content of table and the instruction at the web url http://www.lsi.upc.edu/lclsi/Manuales/wireless/files/wpa_supplicant.conf. Reboot your Raspberry Pi to make the new configuration effective or just restart the WiFi interface typing:
ifdown wlan0
ifup wlan0
In case of trouble, to check if your Access Point is reachable type the command:
iwlist wlan0 scanning | grep ESSID
ESSID:”APFXX”
ESSID:”Alice-XXXXXXX”
ESSID:”APFXXXXXX2”
ESSID:”APFXXXX1”
To discover the IP address assigned to the Raspberry Pi WiFi interface by the access point type:
ifconfig
To get the application automatically start at boot time create a file named radio.sh in the /etc.init.d. directory. Type the following line into the file radio.sh
#!/bin/bash
/home/pi/radio/ada_radio.py start
Make the radio.sh file executable typing the command:
chmod a+x radio.sh
In the next issues we will cover the topic on how add recorded audio file on a USB key and will introduce the topic on how to enhance this project to became a broadcast FM radio station by using a specific radio FM shield with professional characteristics. This way you could make something similar at an FM repeater, broadcasting on air your preferred playlists and audio files.

Related Posts


14 Comments
Leave a Reply
-
 Arduino ISP (In System Programming) and stand-alone circuits
We use an Arduino to program other ATmega without...
- Posted 12 years ago
-

-

-
 GSM GPS shield for Arduino
Shield for Arduino designed and based on the module...
- Posted 12 years ago
-
 Small Breakout for SIM900 GSM Module
Some post ago we presented a PCB to mount...
- Posted 13 years ago
-
 Building a 3D Digital Clock with Arduino
Project to create a digital clock consisting...
- Posted 3 months ago
-
 Acoustic amplifier – in DIY Kit
This kit creates a microphone amplifier with an output...
- Posted 4 months ago
-
 Creating a controller for Minecraft with realistic body movements using Arduino
Project of a controller that maps body movements...
- Posted 4 months ago
-

-
 Holographic Christmas Tree
Beautiful project to create a Persistence of Vision...
- Posted 4 months ago
Pingback: Links 26/6/2014: Linux is Everywhere; A Lot of Android News | Techrights
Pingback: I got a non-sweet Raspberry Pi | Device Plus
Pingback: Internet Radio Raspberry Pi | bv
Pingback: rziahuvz